What is sharpening?
Image sharpening doesn't actually sharpen your image. It is a technique which adds edge contrast which makes an image appear sharper. Most digital photographs will benefit from image sharpening.
Most photographs must start out being properly focused (although there are always exceptions to the rules). Sharpening cannot fix a poorly focused photograph but even with a properly focused image you will find that digital sensors tend to leave you with the impression that the image’s focus isn’t as sharp as it should be. This is just an inherent limitation of today’s technology. Sharpening doesn’t correct blur but it does enhance the definition of edges in a properly focused image, increasing the perception of sharpness.
The perception of sharpness is a combination of resolution and acutance. Resolution is simply the size (in pixels) of your image file. Generally, the more pixels your image has determines how sharp your image can be. Resolution is generally limited by our camera (although there are some tricks we can use to increase resolution).
Aside from resolution the other sharpness factor is acutance, which refers to the contrast at an edge within your image. Edges that have more contrast appear to be more defined and give the impression that they are sharper. Acutance is subjective: you either think an edge has contrast, or you think it doesn’t.
Sharpening is therefore a technique that photographers can apply to an image which increases the contrast and apparent sharpness of edges. We can’t magically add more detail to an image because the resolution is fixed, but we can increase apparent sharpness by increasing acutance.
This is either done by the camera software when it creates a JPEG image or by the photographer during post-processing. Many photographers prefer to sharpen an image themselves (rather than letting their camera’s computer do the work) because the photographer can then control the process. It's important to note that sharpness can always be added to an image but it can’t be taken away. Working with RAW or other lossless image files allows sharpness to be applied in various amounts depending on how large of an image you are planning to print or display.
Many professional photographers sharpen their image multiple times, in small amounts, during post-processing.
How much sharpening should you apply?
Sharpening is done automatically by the camera when you shoot JPEG. The camera will take the data that has been captured by the camera’s sensor and then processes that data into a JPEG image which the camera then saves to the camera’s memory card. Part of this process involves applying sharpening (because even camera manufacturers know that “digital photographs require image sharpening”). Some cameras allow you to set the degree of sharpening from the camera’s system menu and a photographer using this sharpening feature may elect to turn down the sharpening for a portrait or turn up the sharpening for a landscape.
Additional sharpening can always be added in post-processing, but sharpening that has already been applied by the camera when it created the JPEG image cannot be reduced. This is one reason why many photographers prefer to work with RAW files which contain no camera-applied sharpening (please see our article Differences Between RAW and JPEG).
When we are shooting our photograph we frequently have no clue how that photograph will ultimately be displayed. How you display your image actually determines the amount of sharpening that will be required. Images which will be displayed on web sites typically have a smaller file size with less pixels, so they will require less sharpening. Printed images are more complex because not only do they vary in size,different materials and different kinds of paper require different levels of sharpening. Images displayed on glossy paper require less sharpening than those printed on matte paper. Metal, acrylic, and glass surfaces can all affect how sharp a printed image appears.
The size of the details you want to emphasize is one of the most important factors in determining how much to sharpen your image. If you’re printing a portrait then it’s unlikely you want every individual pore on the model’s skin to be visible. On the other hand, for certain landscapes, you might want every blade of grass to stand out. The details you want people to see should be sharpened and those you want them to ignore should not be. For these reasons, many photographers want complete control over sharpening and they want the ability to change the amount of sharpening as their photograph moves through its display cycle.
Since sharpening is a very commonly applied technique, there are frequently many ways to apply sharpening. In addition to camera applied sharpening, most photo processing software includes various options to apply sharpening. However, not all sharpening options are created equal.
When done correctly, even a little bit of image sharpening (such as what your camera does when creating a JPEG image) can improve apparent image quality. Controlling the precise amount of image sharpening can do an even better job. However, like all things when performed too aggressively, you should be aware that sharpening can produce unsightly sharpening artifacts that can negatively affect image quality.
Most software tools for image sharpening employ a technique called “unsharp mask.” While “unsharp mask” may sound counterproductive, this is actually an old photographic technique first used in Germany in the 1930s to exaggerate the brightness difference along edges within an image. This technique does create the appearance of a more pronounced edge, but the key to effective sharpening is delicately making edges appear sufficiently pronounced while also minimizing visible under and overshoots (called "sharpening halos").
Unsharp mask is a quick and easy way to sharpen your images, but a better approach is to use a high pass filter if your photo editing software provides that tool.
The High Pass Filter
Image sharpening is the illusion we create by increasing the contrast along the edges of objects in an image. Because most photo editing software can't recognize actual objects and their edges in an image, software considers an edge to be any area where there is a change in brightness or color between neighboring pixels.

When we Increase contrast along the edges, we make the light side of the edge lighter and the dark side of the edge darker, which our brain then perceives as "sharper". The more we boost the edge contrast, the sharper the image will look.
But to start we must first find those edges. High Pass is an edge-detection filter available in some graphic editing software, such as Photoshop®. This filter looks specifically for edges in the image and then highlights them while ignoring areas that the software doesn’t consider to be an edge. Once we have the edges selected, we can then increase the contrast along those edges without affecting the rest of the image.
For our example we will be using Adobe Photoshop CC 2019® (although older versions of Photoshop will use the same steps):
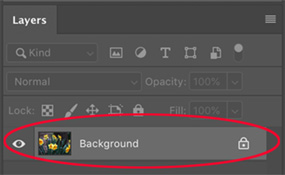
Step 1: Open the image you want to apply sharpening to in your Photoshop® software on your computer. Your image will be displayed in your Photoshop® workspace. Make sure that your Layers Panel is visible (if not, select Window from the menu bar and select Layers from the drop-down menu). Your open photographic file should have only one layer listed in the Layers panel as “Background.”
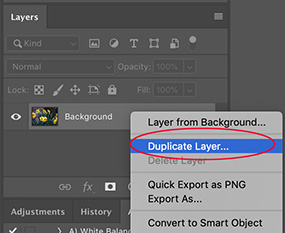
Step 2: Right-click on your Background layer in the Layers panel and select “Duplicate Layer.” You will be prompted to name the new layer (the default naming suggestion is “Background copy” which you can accept or change — since this makes sense we are going to accept that suggestion). This will create an identical duplicate of your Background layer which is named Background copy for us to work with. Both layers will now be visible in the Layers panel.
Your file as you originally opened it is preserved in the layer named “Background” and we can simply delete that layer when we are done or use that layer for additional adjustments All of our work in this example will be done on the “Background copy” layer, and if you are not satisfied with your work, you can simply delete the Background copy layer and start over. But having the two layers will be very helpful if you only want to sharpen a portion of your photograph. You will find that the sharpening we apply will be applied to the entire layer, but after we are done sharpening we can create a layer mask which will allow us to hide portions of the sharpened layer and allow portions of the unsharpened layer to be visible (we will not be discussing layer masks in this article).
Step 3: Right-click on the “Background copy” layer and select “Convert to smart object.” Smart Objects preserve an image's source content with all its original characteristics, enabling you to perform nondestructive editing to the layer.
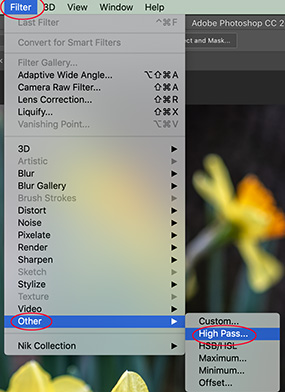
Step 4: With the "Background copy" layer still selected, go to the Filter menu in the menu bar and then scroll down and select Other from the drop-down menu, then select High Pass from the second drop down menu. This will turn your entire photo gray and open the High Pass filter’s dialog box. (Don’t worry — your photo has not turned gray and has not yet been changed in any way. Photoshop® is displaying the gray filter and this is where we are going to find our edges which you will be able to see on the photo’s gray overlay and in the dialog box as we work. If you have not used the High Pass filter before, no edges will be visible, but if you have used this filter before, Photoshop® will remember your last setting and edges may be visible.)
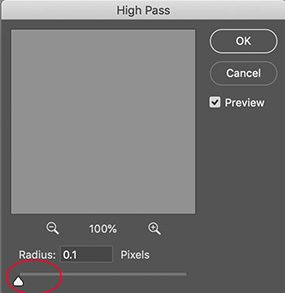
Step 5: The High Pass filter's dialog box shows a preview window at the top and a Radius slider along the bottom. We are using the High Pass filter to detect the edges in your image. Let’s start by dragging the Radius slider all the way to the left, to a value of 0.1 pixels (the lowest possible value). At this lowest setting, the entire image is filled with solid gray and no edges are visible anywhere because the Radius value is too low at the moment for any edges to be seen.
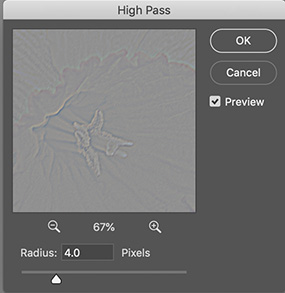
Step 6: Now it is time to start bringing some edges into view. Begin dragging the Radius slider to the right which will increase the radius value. In this example I am going to increase my radius value to 4 (but my photographs are quite large at 36.3 megapixels, so those with smaller sensors may start seeing edges at a lower radius value).
As we increase the radius we will start to see faint highlights at the flower’s edges while other areas of the image that are not considered to be a part of an edge remain solid gray. The radius value determines how many pixels on either side of an edge should actually be considered to be a part of that edge. A radius value of 4 pixels tells Photoshop® to include four pixels on either side of the edge (four pixels on the light side and four pixels on the dark side). Be careful that you don’t drag the radius slider too far to the right because this will include too much of your image as part of an edge.
For best results, choose a radius value large enough to just bring out the highlights while keeping those highlights as close to the actual edges as possible. The value will depend on your image and larger images typically need larger radius values to achieve the same results. Radius values between 1 and 5 pixels generally work best. On this example image I am going to use a radius value of 6 which keeps my image mostly a solid gray while subtly highlighting the edges.
Click OK to accept your radius value and close the High Pass dialog box.
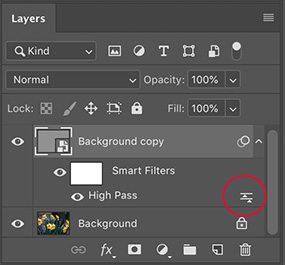
Step 7: The image you are working with is still appears gray because we are looking at the High Pass filter's result. We will now increase the edge contrast in our photograph by blending the High Pass filter's result into the original image. In the Layers panel, The High Pass filter is listed as a Smart Filter below "Background copy". Double-click on the Blending Options icon to the right of the High Pass layer to open the Blending Options dialog box.
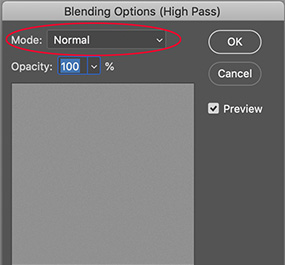
Step 8: The blending mode option is at the very top of the dialog box, called “Mode.” By default the blending mode opens set to Normal, but to use our High Pass edge highlighting to increase the contrast along the edges we will need to use one of the Photoshop® contrast-boosting blend modes. There are a number of options to choose from but we will use “Overlay” for this example. (Feel free to play with the different blending modes some other time.)
After selecting “Overlay” for your blend mode, press the OK button. With the Overlay blend mode, Photoshop® will hide any areas of neutral gray and use the lighter highlights to lighten the light side of the edges and the darker highlights to darken the dark sides, increasing the contrast of the edges.
Your image has now been sharpened. I find that it takes a little practice to get things right while working with a plain gray image with only some edge highlights visible. If you feel that you sharpened your image too much, since you still have your original Background image in a layer below your sharpened Background copy layer, you have the option to reduce the opacity of the Background copy layer to tone down the sharpening.
If you feel you didn’t sharpen enough, you can hide your Background copy layer and try these steps again (we hid the layer so that we can preserve our work in case we decide to return to it; additional layers do increase file size so once I am done working I typically delete layers I don’t see a need to retain).
You can also create a layer mask for the Background copy layer to block any sharpening that you don’t want visible in your final image (such as for a close-up portrait, where you could block sharpening over the skin but reveal the sharpening for the eyes and hair).
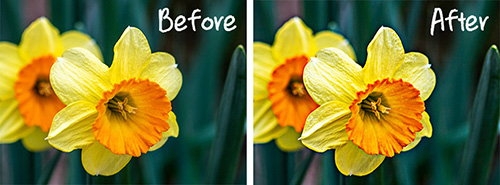
Here is a crop of the image before we started sharpening alongside an identical crop of the sharpened image. You should be able to notice a significant difference in the apparent sharpness but the only thing we did to the image was increase the contrast along the edges that we selected to enhance with the High Pass filter.
I typically do all of my post-production work before sharpening, saving sharpening for one of my last steps. I believe it helps to get the photo’s exposure, color, and contrast set the way I want it before I apply sharpening.
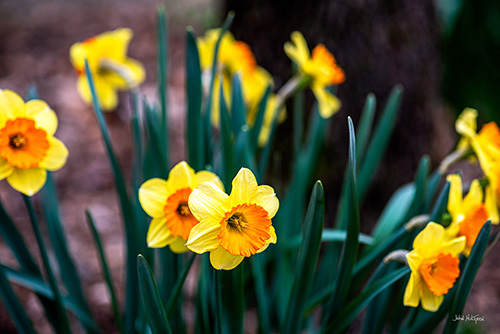
And here is the final image that we have been working on in this example:
While this may seem like a lot of work (and it is a lot of work that takes time, particularly when you are just learning it), you will find that Photoshop® actually has some very useful tools and options that can assist your work flow. One of the tools that I make extensive use of is Photoshop® Actions. An action is like a macro where I can create an action and then record the steps that I want Photoshop® to perform when I play the action back.
I created an action that I named “Sharpen.” When it is time for me to sharpen my photo, I select the Sharpen action from the Actions panel and then press the action play button. Photoshop® quickly progresses through each of these steps, pausing for me to adjust my radius and then pausing for me to select my blending mode. I can sharpen most of my photographs in only a few second with four mouse clicks.
I use actions quite extensively. Actions significantly speed up my work flow but they also act as a check list so I don’t forget any steps (especially components of complicated steps).
 ADVERTISEMENT