Many cameras give the user the option of saving their photos as either a JPEG or a RAW file (or both at the same time), so which option is best for you?
This decision can be further complicated by well-meaning advice the photographer receives from others. It’s not uncommon for a photographer to hear that “professional photographers always shoot RAW files” and then hear a professional state that they only take JPEG files. What is a photographer to think?
Both JPEG files and RAW files can produce excellent results, but there is a big difference between the two. The decision on which type of file to use for your photographs really comes down to one question: Since all photographs will need to be processed after you take your photograph, do you want your camera’s computer to do most of the photo processing? Or do you want to do all of the photo processing yourself later on your own computer while using photo processing software?
What happens when you press the shutter button?
When you press the shutter button on your camera, the light from the image that is focused onto your camera’s sensor is captured by that sensor as a whole lot of data. It’s not a picture yet — the camera’s sensor is a solid-state electronic device containing millions of light-sensitive photosites that converts an optical image’s tonal value or brightness into an electronic signal. This data still needs to be processed into a photograph before it can be viewed and enjoyed (similar to when we took photographs with film — the film still needed to be developed and photographic prints still needed to be exposed and developed before we could view and enjoy the photograph).
The camera’s sensor sends this data that it has captured to the small computer built into your camera as a large collection of “bits.” A “bit” (short for binary digit) is the smallest unit of data in a computer and a bit has a single binary value of either 0 or 1. Depending on the camera’s sensor, the length of this string of data from each of those millions of photosites can be either 12-, 14-, or 16-bits long.
After the camera’s shutter has been depressed, the camera’s computer will receive this large collection of data and the decision you had to make before you pressed that shutter (on what file type to save your photos) determines how all of that data will be handled and saved by the camera’s computer: to either convert all of that data and save a JPEG file to your camera’s memory card, or simply save all of the data without any processing as a RAW file to your camera’s memory card (in reality, when the camera saves all of the data as a RAW file, the camera also creates a low-resolution JPEG as a preview image and embeds that JPEG into the RAW file — this is the image that you will see on your camera’s display when you review the images that you have captured).
If you have decided to let the camera save the image as a JPEG file, then you have decided to let your camera’s computer make a lot of decisions about how great that photograph will ultimately look. The camera’s computer has been programmed by software engineers to make decisions that can make some drastic changes to your photograph, and then the camera’s computer will discard a lot of the data that the sensor collected before it saves its finished photograph as a JPEG file on your memory card.
You can still alter and edit this JPEG file later after you have downloaded the JPEG file to your computer, but at this point it is a tainted file (the camera’s bias is already locked into your photograph and a good chunk of the data which was collected by the camera’s sensor has already been discarded).
Many cameras allow you to affect the camera’s bias with some user-selectable terms built into the camera’s software (such as Standard, Neutral, Vivid, Faithful, Landscape, Portrait, or Monochrome). And camera software has advanced to where it can do a very good job handling this processing task. But photographers can also do a very good job processing photos with the right software and some experience.
As photographers gain experience in post-production, many find that they can do a better job processing their photographs than the way their camera’s software engineers anticipated for every photograph. Although while some photographers will opt to do the photo processing themselves, it is also true that not every photographer has photo editing experience or even wants to spend a lot of time processing each and every photo (and it is also true that not every photographic event warrants the extra processing work).
So both file-type options have their place and it is not uncommon to find photographers switching between the two options. This article explains how the two options differ and highlights some of the advantages and disadvantages of each option.
What is a JPEG file?
Both JPEG and RAW files are a type of electronic container for the data contained in a digital photograph. This container determines how data for a photograph is grouped and stored electronically so that it can be rendered by software later to display and/or print the photograph. Just like a written document can be stored electronically as a Microsoft Word document or a HTML file (and for both, the printed output can look identical), both of these file type containers have features that are unique to their file type and both have their pros and cons. Photographic file types are no different.
The term JPEG is an acronym for the “Joint Photographic Experts Group,” which created the standard for this method of digital image compression. JPEG is a class of data encoding that uses inexact approximations and partial data discarding to represent the content. JPEG compresses the data to reduce the size of the data so that it can be more easily and economically stored or transmitted, and this type of compression is commonly referred to as “lossy” compression (because there has been a “loss” of data, as compared to ‘lossless’ compression where no data is discarded). Lossy compression is also irreversible while lossless compression is reversible.
Each pixel in a JPEG file, by design and according to the JPEG standard, is 8-bit (which is smaller than what your camera’s digital sensor can record).
As more compression is applied to the data by making higher degrees of approximation, one will typically discern a degradation of the data. Lossy compression is most commonly used to compress multimedia data such as audio, video, and images. By contrast, lossless compression is typically required for text and data files (such as bank records where a missing decimal point is unacceptable).
The JPEG compression algorithm works very well for many photographs where scenes have smooth variations of tone and color, but JPEG compression is not well suited for graphics which have sharp contrasts between adjacent pixels because the compression process can cause noticeable artifacts. These types of mages are better saved in a lossless graphics format such as TIFF, GIF, PNG, PSD, or a RAW image format. And a JPEG is also not well suited for files that will undergo multiple edits as some image quality is lost during recompression each time the image is saved (which means that if you have a JPEG file that you wish to edit, save the file in a lossless format first and then convert it back into a JPEG when you have finished editing).
What is a RAW file?
A camera RAW image file can be thought of as a sensor capture (taking all of the data that a camera’s digital sensor recorded and then storing that data unedited). They are called “raw” files simply because they are not yet processed and are not ready to be printed or edited with a bitmap graphics editor (like a raw hamburger is still a hamburger but a cooked hamburger is ready to eat, and furthermore as a cooked hamburger which is well-done cannot be returned to a medium doneness). Depending on the camera manufacturer, RAW files have different file extensions (Hasselblad uses 3FR; Canon uses CRW, CR2, and CR3; Epson uses ERF; Nikon uses NEF; Olympus uses ORF; Pentax uses PEF; and Sony uses ARW, SRF, and SR2) and not all files with the same extension are the same (software might be able to read an older version of a proprietary RAW file but perhaps not the latest until the software has been updated). RAW image files must first be processed by a RAW converter where precise adjustments can be made before conversion to a "positive" file format such as TIFF, PSD, or JPEG for storage, printing, or further manipulation. There are hundreds of RAW formats in use by different models of digital equipment.
RAW image files are sometimes described as "digital negatives" although they are not negative images. But they do fulfill the same role as negatives did in film photography where the negative is not directly usable as an image but has all of the information needed to create an image.
Like a photographic negative, a RAW digital image may have a wider dynamic range or color gamut than the eventual final image format, and it preserves most of the information of the captured image. The purpose of RAW image formats is to save, with minimum loss of information, data obtained from the sensor and the conditions surrounding the capturing of the image (the metadata such as date, shutter speed, aperture, ISO, lens information, location GPS coordinates, etc.).
To be viewed or printed, the output from a camera's image sensor has to be processed and then stored in a standard raster graphics format such as JPEG. This processing, whether done in-camera or later in a RAW-file converter, involves a number of operations but when a camera saves a RAW file it defers most of this processing until later.
When most cameras save a RAW file they also generate a preview JPG and embed that into the RAW file's data. It's that JPG you're seeing when you preview photos on your camera’s screen. It's also used as the preview in some imaging apps to speed things up. Some processing (such as white balance) is applied to this preview JPEG, but since all of the data from the camera’s sensor is included in the RAW file, any processing is totally reversible.

Which file type is better?
You are probably thinking that when you take a photograph to be printed (or when you upload it to social media for display), your photograph needs to be a JPEG in the sRGB color space, so why not save a lot of time and effort and just let your camera immediately save the photograph as a JPEG?
That is certainly an option and no one would fault you for doing so. Many people are quite happy with the quality of the JPEG file produced by their camera, which are typically a very high quality. And most people would rather spend their time out taking photographs instead of working late into the night with their photographs on a computer.
But, as a photographer, there may well come a time when you want more from your photographs. One day you may be out with your camera and become overwhelmed by the tonal variations you see in a scene and say to yourself: “This would make a spectacular photograph!” Then you hurriedly set the camera settings and snap away. You can’t wait to see the amazing photographs you just took but when you look at them later on your computer, your heart sinks. The tonal variations that you saw just aren’t there in the JPEG that your camera produced. And there isn’t much you can now do about that, since most of the data that your camera’s sensor saw has been discarded and compressed when your camera created the JPEG that was stored on your memory card.
You can’t go back and retake the photo because the conditions that made this a spectacular shot are now gone. If only there was a way to go back and recover the data that was captured yourself. There would be — if you had the original RAW file.
Cameras and photographs have never been as good as our eyes. The human eye is truly remarkable and can perceive a much greater dynamic range than is ordinarily possible with a camera, up to 10 f-stops (and with a little bit of adjustment time in low light situations that range can increase to nearly 24 f-stops). Most digital imaging sensors have an approximately 5- to 6-stop dynamic range (remember that a stop is a doubling or halving of the amount of light that you are allowing into the camera). This explains why some scenes as you view them can easily exceed the dynamic range of your camera’s digital sensor or the dynamic range that can be displayed in your photograph.
Dynamic range is a measure of the range of light intensities from the shadows to the highlights. In low light situations the dynamic range (the difference between the darkest and the brightest part of the subject) can be quite small, but on a bright sunny day that range will be quite higher (and can exceed the 5 to 6-stop dynamic range of your camera’s sensor).
That’s always been the case in photography. Those of us who have spent time in a darkroom learned a lot of tricks to make parts of our photograph more or less visible (moving those parts back into the displayable dynamic range through such tricks as dodging and burning), and it certainly is a lot easier now working with software (and you can make your adjustments and save your work, which is a whole lot easier than trying to make the same precise adjustments manually to each additional print later). (And our work environment now also smells a lot better without all of those chemicals!)
But photographers have always had to work at making enough relevant detail fit into the viewable dynamic range available in a photographic print (or monitor), and digital photography is no exception. Think of a photograph of a bride standing next to her groom. You want the bride’s gown to appear white but you don’t want it to be a paper-white blob lacking all detail. And you want the groom’s tuxedo to appear black but you don’t want it to appear as a pure black blob lacking all detail. You want to see a little bit of detail in both the white gown and the black tuxedo but the dynamic range available in a photographic print or monitor may be too limited to do this for both the white bridal gown next to a black tuxedo. This is where a RAW file with a lot of data becomes very valuable because it is possible on the computer to move some of the data back into the viewable dynamic range. This is called tone mapping which is a technique used in image processing and computer graphics to map one set of tones or colors to another to approximate the appearance of high-dynamic-range images in a medium that has a more limited dynamic range.
Tone mapping is easy to do with a RAW image since a RAW image contains more data than can be viewed in most mediums that already have a limited dynamic range. However, since a JPEG has discarded data that doesn’t already fit into its displayable dynamic range, a JPEG file limits your ability to perform tone mapping.
When the camera creates a JPEG the camera makes its best software guess, discarding details that are at the top or bottom of the dynamic range and then makes what it thinks should be the black and white points. 12-bit RAW files have over 4,000 tones, and 14-bit RAW files have over 16,000, but 8-bit JPEG files have only 256 tones. Higher bit depth files also potentially have a much larger number of colors: an 8-bit JPEG can represent around 16 million colors, whereas a high bit-depth RAW file can represent over 28 billion colors. 16 million colors may seem like enough, but with heavy editing you will start to see color banding or blotchiness in your photo. Your high-bit-depth photo with billions of potential colors will hold up much better to editing.
Even though your camera sensor captures high-bit-depth data, when you (in post-production) or your camera creates a final JPEG file for printing or display, the information has to be tone mapped in to the 8-bit range. The camera’s software makes its decision on which of this information is important to retain, but for more accuracy the photographer can make that decision manually later in post-production. The information still has to be reduced to 8-bit for your final output file but you can make the decision yourself on how to spread that information out across those 8 bits. Keeping the bit depth high until you are done editing allows this detail to be stored until it can be tone mapped by the photographer rather than the camera’s computer.
Cameras also do a good job assessing color balance, but there are times when there are extremes in natural color balance where the camera’s computer just wasn’t programmed to make every conceivable decision as well as our brains can. Think of scenes that are illuminated with two light sources that each have a different color temperature. Or a close-up portrait of a person wearing a magenta sweater — most camera software will see a large cast of magenta as an abnormal light and will attempt to make a color correction.
Examples
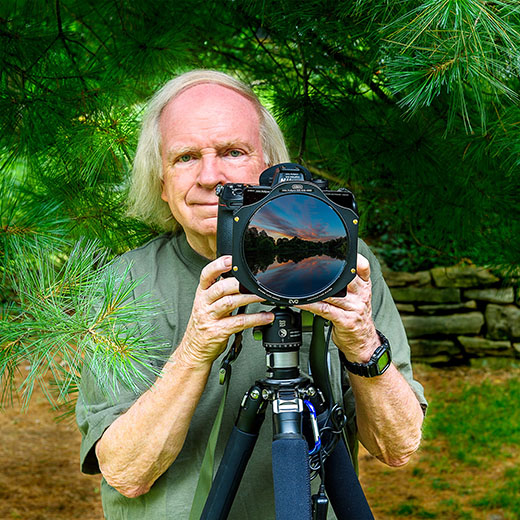
For the following example images we will be using an image shot from my Nikon D810 with a Nikon ED AFS-Nikkor 28-70 f2.8 D lens. The principles discussed in this article apply to all cameras although the differences may vary slightly from model to model.
Remember that JPEG files are mostly finished photographs that have been processed by the camera’s software. Although cameras usually allows the photographer to make some manual processing decisions (such as color temperature and sharpening through the camera settings) the camera further processes the image to add blacks, contrast, brightness, and noise reduction and then the camera’s computer will render a processed photograph as a compressed JPEG file. JPEGs produced by the camera are finished files which can be viewed and printed immediately after they have been shot although a photographer may choose to continue making further limited adjustments later on their computer.
If a photographer wishes to continue making further adjustments they should understand that because the image has been compressed and saved as a JPEG (which is a “lossy” file format), much of the initial image information and detail has been discarded and cannot be recovered. One of the data sources that has been discarded (through compression) concerns dynamic range which is the amount of tonal range detail from the darkest shadows to the brightest highlights. The dynamic range detail in JPEG files is significantly reduced as compared to RAW files.
Example 1:
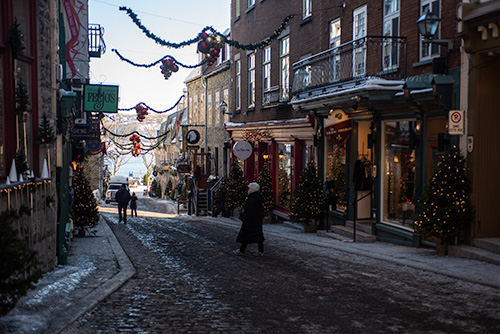
Example 1 is an image that was shot at 1/125th shutter speed with an f/3.5 aperture and an ISO of 64, including a manual -1/3 exposure compensation. It was processed within the camera and saved to the camera’s memory card as a JPEG file. This photograph has an extreme dynamic range, with the majority of the photograph being in the shadows and a small portion of the visible distance being in full noon sunlight (the photograph was shot at 11:57 a.m.) If the photograph had been metered in the shadows, the foreground would have been better exposed but the background would have been blown out. I chose to meter on the brightly exposed background because I knew that I could probably work with this photograph in post-production and I find it works better to bring detail back from slightly underexposed areas than bringing detail back from overexposed areas. It is certainly usable straight from the camera but it doesn't exhibit a good amount of blacks, decent contrast, or display good brightness. (and it is just unimpressive) Each camera manufacturer and model may differ but the amount of processing would be similar to adding +50 Brightness, +25 Contrast, and +5 Blacks to a RAW image in Adobe Lightroom. A photographer could certainly improve this JPEG photograph through additional post production work but trying to brighten the area in the shadows is going to produce a murky image and blow out the background.
In addition, the camera processing when producing a JPEG file also includes sharpening. Sharpening doesn’t correct blur from an unfocused photo but it does enhance the definition of edges in an image. Most images can benefit from sharpening and many professional photographers sharpen their image multiple times, in small amounts, during post-processing.
Some cameras allow you to set the degree of sharpening from the camera’s system menu. A photographer using this feature may elect to turn down the sharpening for a portrait or turn up the sharpening for a landscape. While this may sound like a beneficial feature, once sharpening has been applied to a JPEG it cannot be turned down later.
Cameras also apply noise reduction to JPEG files. Image noise originates from either the camera sensor or the sensitivity of the camera sensor, and sometimes both, and is defined as aberrant pixels that are not representing the color or the exposure of the scene correctly. Many cameras also feature an optional noise reduction mode when shooting long exposures, and this noise reduction feature can be applied when capturing RAW or JPEG images during long exposures. However, regardless of your camera’s noise reduction settings, cameras will also apply additional noise reduction when processing the JPEG file. This may be helpful for most casual photographs but some professional photographers prefer to manually control noise reduction within their software. A photographer can work with this file in post-production but a photographer cannot recover the detail that was lost from the in-camera noise reduction, which is generally inferior to software based noise reduction solutions.
RAW files are unprocessed data captures of all of the detail that was available to the camera sensor. Camera sensors are responsible for capturing data but this RAW data doesn’t necessarily make a good photograph until it has been processed. Data that is unprocessed tends to look flat and a little dark.
Example 2:
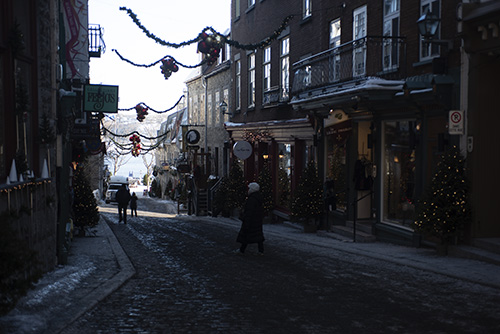
Example 2 is the RAW version of the same shot in example 1. The photograph used in example 1 and 2 was shot in RAW+JPEG mode which is an optional mode available on most cameras that saves two files to the camera’s memory card (one file is saved as a RAW file, and the other is processed by the camera and saved as a JPEG). Notice that the image is flat because it lacks contrast and true blacks, and that it is also darker. Again, RAW files have not had any processing and are true data captures from what data the camera’s sensor recorded. Some software, such as Adobe Lightroom, may be setup to do a minimal amount of processing (such as adding blacks, contrast, and brightness) to a RAW file during the camera import process, but this example is what a “zeroed” RAW file actually looks like straight from the camera.
A RAW file may display quite a bit more noise than a processed JPEG, but more noise also brings more detail and sharpness.
Example 3:
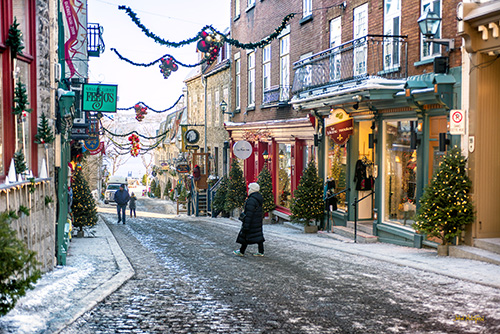
Example 3 is the finished JPEG file after post-production of the RAW file in Adobe Lightroom and then finished in Adobe Photoshop. I knew when I decided to capture this photograph that it would have an excessive dynamic range, but I felt I would be able to correct that in post-production. The finished photograph exhibits a good amount of blacks, decent contrast, and displays good brightness even in the shadows. I was able to brighten the shadowed foreground quite a bit while retaining detail in the background that was in full sun. I was able to make the colors a little more vibrant and I could play with the sharpening until I achieved what I felt was the right amount. After a little bit of work I believe this photograph looks much more appealing (and this photograph was subsequently selected for publication in USA TODAY Life). With my software I was able to measure some of the whites and more precisely set the white balance/color temperature of the photograph, and I could zoom in on some edges and manually select the amount of noise reduction that I felt worked for this image. I could not have achieved this while working with the camera's JPEG image, but by using the RAW image I still had access to the scene's detail and was able to work with that detail, preserving the image and obtaining a photograph as I envisioned it should look.
Aside from in-camera processing, one of the biggest differences between a RAW and a JPEG image is the amount of dynamic range and tonal detail information that is contained in the file. Because in-camera JPEG processing adds around +50 Brightness to an image, photographs can become significantly more overexposed than intended. Since much of an image’s dynamic range and image detail are discarded when compressing a file into a JPEG, it can become nearly impossible to repair a JPEG in post production and RAW files are much more forgiving when it comes to brightening underexposed images because there is usually enough tonal detail in a RAW file to bring up the exposure by +2 or more full stops of light. Under-exposed images can also suffer from in-camera processing. Since the camera adds +50 Brightness during camera processing it may look like the JPEG image does a better job with an underexposed shot, but the additional blacks and contrast added to the JPEG image during in-camera processing are going to clip the detail in the shadows and this shadow clipping will not be recoverable.
Are both the RAW and JPEG formats useful?
Absolutely.
But are either the RAW or JPEG format superior? Certainly! Some photographers will tell you that JPEG files are just as good as RAW files, but in reality they are not because there is a tremendous difference in the amount of information retained in a RAW file when compared to a JPEG file.
Since the RAW format is the clearly superior file format, should photographers always shoot in RAW? That depends on what type of photography you shoot. Both the RAW and JPEG formats have their uses and some photographers frequently use both file formats. For example:
As a photographer, regardless of how you are going to save this shot in your camera, your first step in creating a great photo is to try to get the shot properly exposed in-camera. Optionally (but recommended) is to post-processes your photo to your liking, No amount of post-processing will be able to save a truly bad shot but it can definitely take a good shot to the next level.
Since all camera sensor captures require some post processing, deciding how much post-processing should go into a shot is subjective and part of the photographer’s creative process, but the options available to you are really endless, especially with RAW files. Both types of files have their pros and cons and neither type of file is ideal for all photographers, amateur or professional, or ideal for all situations,
As a photographer you should use the ability to edit your photographs as a way to take your original concept as envisioned in-camera and bring that concept to life. Editing can restore depth, color, saturation and contrast to something close to what your original vision was when you decided that your original vision deserved to be preserved as a photograph. You can use photo editing to fine-tune your composition and get the best possible photographic print possible.
 ADVERTISEMENT