Published on March 5, 2024
Updated on April 9, 2024
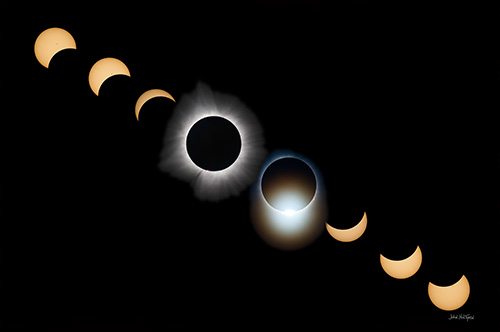
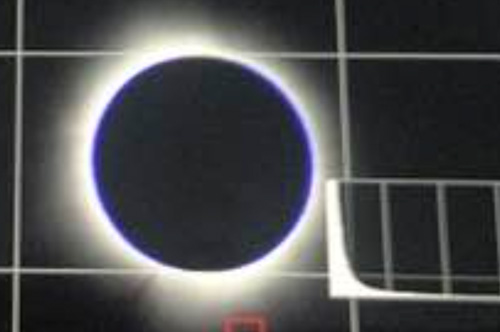
The 2024 Total Solar Eclipse captured from Columbus, Indiana.
Solar eclipses are actually a fairly common although regionally isolated event, typically occurring twice a year somewhere on this large Earth. Most people will witness at least one partial solar eclipse in their lifetime, but most people will not witness one of nature's true splendors — a total solar eclipse. A solar eclipse is one of the most important global events you will ever have the incredible privilege of witnessing, and being able to photograph a Total Solar Eclipse is fairly rare and can be truly spectacular to experience and document.
There have been 17 total eclipse events to affect at least a portion of the continental United States since the middle of the 19th century, when astronomy began its modern era of observation. These were in 1869, 1878, 1889, 1900, 1918, 1923, 1925, 1930, 1932, 1945, 1954, 1959, 1963, 1970, 1979, 2017, and 2024. Of these, only the 1918 eclipse traversed the entire country coast-to-coast. After 2024, it will be 20 years before another total solar eclipse comes to the United States.
An eclipse occurs when one celestial body passes in front of and obscures another celestial body. Here on Earth we typically experience two types of eclipe: 1) a solar eclipse when the Sun is obscured by the Moon, and 2) a lunar eclipse when the Earth blocks the Sun and causes Earth's shadow to fall on the Moon. Lunar eclipses cause the brightness of the Moon to dim and sometimes turns the Moon's surface a striking red color. Each lunar eclipse is only visible from half the Earth and can only occur during a Full Moon when the Moon passes through all or a portion of Earth's shadow.
In order for an eclipse to occur, the Sun, Moon, and Earth need to line up in a perfectly straight line. A solar eclipse can only occur during a New Moon when the Moon passes between the Sun and Earth. Even though we have a New Moon every 29-½ days, the Moon's orbit is tipped 5 degrees to Earth's so the Moon's shadow misses Earth during most New Moons.
Not drawn to scale. Diagram of the Moon casting a narrow shadow on Earth during a solar eclipse.
In a total solar eclipse the Sun is fully blocked by the Moon, creating a narrow path of totality, or a dark shadow, on Earth’s surface that ranges between 108 and 122 miles wide. A partial solar eclipse is more common, happening twice a year, and occurs when the Moon doesn't perfectly line up with the Sun and only covers part of the Sun. During a total solar eclipse, only those within the path of totality will experience the Moon blocking out the entire Sun. Those outside the path of totality, because they are not perfectly lined up, will experience a partial solar eclipse and will only see part of the sun blocked by the Moon. An annular solar eclipse occurs when the Moon lines up with the Sun, and is centered in front of the Sun, but because the Moon is farther away from Earth and appears smaller, it does not completely block the Sun. Because the Moon’s orbit around Earth is elliptical, rather than circular, the Moon's distance from Earth varies. In annular eclipses the viewer will see the famous “ring of fire” phenomenon because the Sun appears larger than the Moon.
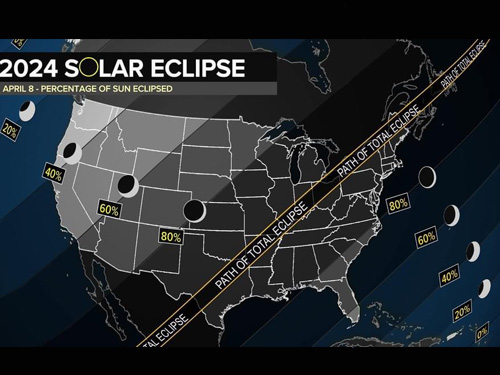
A map showing the narrow path of totality where a total solar eclipse was visible on April 8, 2024,
In summary, for a total solar eclipse to be visible you must be located within the path of totality and the Sun must be close enough to the Earth so that it blocks the entire Sun. If you are not in the path of totality, but close to it, you should see a partial eclipse. If the Moon is too far away from Earth to fully block the Sun, but still lined up with the Sun, you will see an annular eclipse with its Ring of Fire. A total solar eclipse can only be viewed from a relatively small swath of the world. Although total solar eclipses occur somewhere on Earth about every 18 months, they are only visible from the same location on Earth about once every 375 years.
Very Important Vision and Camera Sensor Safety Information
Remember how you can start a fire by using a magnifying glass and the sun? Looking at the sun without eye protection, particularly through a lens, can permanently damage your eyes, and focusing a camera on the sun without a protective filter can permanently damage your eyes and your camera's sensor. The American Astronomical Society recommends you wear solar eclipse glasses at all times while viewing a solar eclipse.
If you are not within the path of totality during the few minutes when the Sun is completely blocked by the Moon, and if it has not turned dark, you should never remove your solar eclipse glasses while viewing the event. During totality, after it has turned dark and you can no longer see sunlight (as if it were dawn or dusk), it is safe to remove your solar eclipse glasses but as soon as the Sun begins to reappear you should put your solar eclipse glasses back on to continue viewing the rest of the eclipse.
Do not point a camera at the sun unless the optics are fitted with a certified solar filter. Optics magnify the intensity and brightness of sunlight, and this can injure your eyes and damage your equipment.
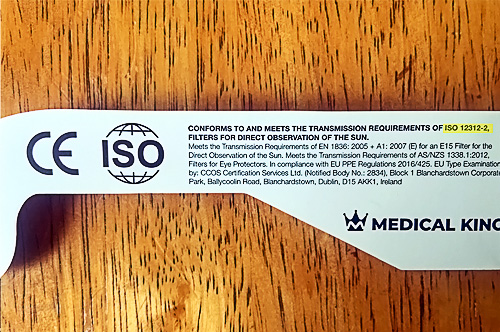
Make sure that your solar glasses and solar camera filters are ISO 12312-2 certified regardless of how they are marketed for solar eclipse viewing or photography. Neutral Density filters that are not ISO 12312-2 certified, even though they can significantly darken the light, are dangerous because they do not block UV light, the most damaging part of the light spectrum to human vision. Only use ISO 12312-2 certified solar filters and glasses from a reputable supplier, and beware of fake imitations and unsupported claims.
If you are planning to photograph a solar eclipse, here are a few pointers to increase your chances of success:
Be prepared: If you are going to be in the path of totality, a lot of other people have probably planned to travel to the same location also and it may be crowded. Traffic may be delayed, so give yourself extra travel time. Make sure you have enough gasoline in your vehicle in case you are delayed by traffic jams. Refuel for your return trip before the eclipse if you have the opportunity. Bring snacks and water, along with sunscreen, bug spray, a hat, and a chair or stool. During the eclipse the temperature may drop up to 20 degrees, so bring extra layers of clothing. Most likely, the majority of those viewing the eclipse at your location will all plan on leaving the area at the same time after the eclipse is over, so plan an alternate return route if necessary. There are inexpensive apps available for your phone and tablets that will walk you through the steps for photographing an eclipse, in real time, that you may find helpful. For the 2024 eclipse I used the Solar Eclipse Timer app because that app lets me geolocate to the location where I have set up (so my times will be accurate) and it offers voice prompts for events, such as telling me when to remove my solar filter and then telling me when to replace my solar filter when totality is over and the dangerous IR and UV light returns. Removing and replacing solar filters takes a little bit of time, so having the voice prompts (along with a magnetic solar filter) helps me manage my shots.
Be prepared for impacts on cellular and GPS service. Cellular service availability may be affected by a large number of people in your area trying to use the cellular network at the same time. As the eclipse approaches, a solar eclipse impacts Earth's upper atmosphere due to the sudden reduction of solar radiation reaching the Earth's atmosphere, which can affect radio communications and navigation systems.
Any camera is a good camera: Taking a great photo has more to do with the photographer having a good eye and a vision for the image that the photographer wants to create than the camera being used. While a telephoto lens will help you capture a close up of the eclipse, there are also other things happening during this changing environment that are worth capturing in landscape shots.
While the Sun is the prime subject of an eclipse, as the Moon slides in front of the Sun the landscape will be bathed in long shadows, creating eerie lighting across the landscape. Light filtering through the overlapping leaves of trees creates natural pinholes which will also create mini eclipse replicas on the ground. Everywhere you can point your camera can yield exceptional imagery so be sure to compose some wide-angle photos that can capture your eclipse experience.
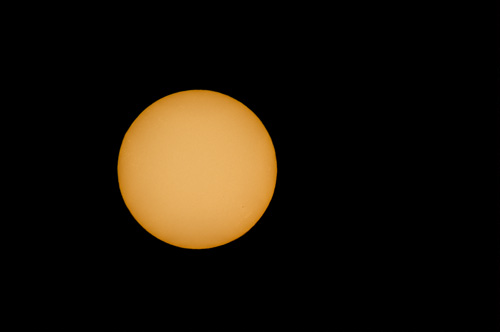
For my practice shot I used an 850 mm lens with a Neutral Density 100000 Solar Filter at 1/500 sec, ƒ/11, ISO 64, 5900 K.
Practice beforehand: Be sure you know the capabilities of your camera and equipment, and are comfortable using your equipment, before eclipse day. Make sure you know how to adjust your camera's ISO, aperture, shutter speed, and color temperature (either use "Daylight" or 5900K) to control exposure, and how to manually focus your camera for crisp shots. Practice setting up your camera for bracketing (if your camera offers that feature) which you will need to switch into when you enter totality and switch out of after totality ends.
You don't want to spend the entire eclipse event messing around with your camera gear or viewing it entirely through a camera’s viewfinder or on an LCD screen, so spend a good amount of time practicing on the uneclipsed sun to become familiar with your equipment, and during the event be sure to look at the eclipse and enjoy it with your own (protected) eyes.
For DSLR cameras, the best way to determine the correct exposure is to test settings on the uneclipsed Sun beforehand. Using a fixed aperture of f/8 to f/16, try shutter speeds between 1/1000 to 1/4 second to find the optimal setting, which you can then use to take images during the partial or annular stages of the eclipse. During totality, even though you have removed your filter, you will still need to decrease your shutter speed to ½ second or longer to reveal detail in the Sun’s corona. Set your color temperature to "Daylight" or 5900 K.
During the partial eclipse before and after totality, shutter speed is going to be your most important factor. I recommend starting at around 1/1000 second but this will vary. No matter what phase of the partial eclipse you are in, the sun's brightness will not change much so your exposure settings will remain the same throughout most of the event, except during the dark totality. Due to the movement of the Earth and the Moon, along with potential wind, I do recommend a faster shutter speed rather than a slower one. And with the Sun putting off an abundance of light, your ISO can remain quite low in the 200-400 ISO range.
With your shutter speed and ISO set, you can use spot metering or highlight weighted metering (preferred) to meter the sun and get your aperture setting. Depth of field really isn't an issue here since the Sun and Moon are so many thousands of miles away so I typically try to shoot at f/8. In general, many lenses in the 35mm classification tend to have their best sharpness in the middle of their aperture range, which is often around f/8 to f/11. but this can vary.
As totality approaches, two spectacular moments you won’t want to miss are the Baily’s Beads and the Diamond Ring, and both of these happen very quickly. You’ll still need to keep your solar filter on for these moments even though much of the light has diminished.
For the Diamond Ring, which is seen as the moon almost totally covers the sun, I recommend changing your shutter speed to around 1/60 second to help create that dramatic shining effect.
For Baily’s Beads, seen at the last moment before totality when you can still see the Sun through gaps in the terrain of the Moon, I recommend setting your shutter speed back to the setting you used during the partial eclipse phase and switching your shutter mode to continuous high speed. Baily's Beads happens within just a few seconds so holding that shutter down and capturing as many frames as you can will help ensure you don’t miss the magic moment.
Typically the Diamond Ring effect happens first, followed by Baily’s Beads. Since both of these happen extremely close together, and they will require a shutter speed change, it may be beneficial to focus on photographing just one or the other.
When we move into full totality, you will need to quickly adjust your camera and exposure settings. First, remove your solar filter as it’s not needed during the totality phase (as long as you are in the path of totality — if you don't know for certain that you are in the path of totality, and if it has not turned dark like dusk or dawn, then you must keep your solar filter on your camera and use your solar glasses when looking at the sun). It is going to become dark so you will need to let more light into your camera to continue taking photographs. It is highly recommended you bracket various shutter speeds throughout totality over a range of up to 10 stops. Your ISO can remain low, around 200, and your aperture can remain around f/8, but you will want to try various shutter speeds from 1/1000 second to 1 second to get different creative looks. Depending on your focal length, with slower shutter speed you may capture some motion blur as the Moon moves, which is going to be hard to notice as you are working so it makes sense to keep your shutter speed faster and compensate by increasing your ISO.
As totality ends, make sure to put your solar filter back onto your lens as the eclipse enters the last partial phase.
Use a proper solar filter: Never look at the sun with your naked eyes, or through a telescope, binocular or camera viewfinder without a safe solar filter. Failure to do so can result in serious eye injury or blindness.
The sun’s powerful rays can burn the eyes and damage the retinas of those who don’t wear proper eye protection. Even viewing any part of the bright sun through camera lenses, binoculars, or telescopes without a special solar filter could instantly cause severe eye injury. The sun can also damage your camera’s lens and the intense light focused directly on your camera's sensor can cause permanent camera damage.
You will need to use a 16.6 stop Solid Neutral Density Solar Filter (ND 100000) that is also ISO 12312-2 certified on your camera and you should also wear approved ISO 12312-2 certified solar eclipse sunglasses when you are gazing away from your camera towards the sun. If you are in a total eclipse, when it suddenly gets dark and you can no longer see the sun it will be safe to remove your solar glasses and the camera's filter to look at and photograph the eclipsed sun. In fact, during totality, you must remove your camera's filter if you want to keep photographing. Having a magnetic camera filter will allow you to quickly remove and replace your camera's filter during totality.
Make sure that your solar eclipse glasses are labeled with the ISO logo and the number 12312-2.
It is important to check your solar eclipse glasses for the "ISO" logo and the number 12312-2, which means the glasses are certified by the International Organization for Standards and they will filter out the damaging rays that the sun gives off. Certified items are 100,000 times darker to block out nearly all visible, infrared, and ultraviolet light. Trust your source and beware of imitation or improperly labeled items.
Some tutorials recommend using a neutral density filter (without mentioning ISO certification) or stacking neutral density filters, but experts at NASA, the National Science Foundation, the American Astronomical Society, Nikon, Space.com, Sky & Telescope magazine, and others all recommend using a properly designated solar filter instead of using a simple neutral density filter, regardless of how dark the filter is. These are the only filters designed specifically for viewing the sun, and they are constructed to not only sufficiently dim the sunlight, but they also protect your eyes and equipment from non-visible IR and UV radiation. Some ND filters are also marketed for solar photography. To protect your eyes, make sure you are using an ISO certified solar neutral density filter from a reputable company and pay attention to the fine print that comes with your filter concerning whether it is safe to view the sun.
As an additional safety precaution, view the eclipse through your camera's monitor display (if your camera has one) and not the camera's optical viewfinder. The camera's monitor will not emit any dangerous IR or UV radiation, which can pass through your camera's optical viewfinder.
Do not use your flash: At all! Even when it is dark. Your flash isn't strong enough to illuminate the moon which is about 239,000 miles away, and your flash will disturb others trying to photograph in your vicinity.
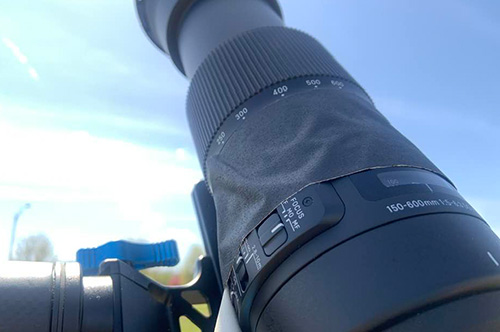
Use a telescope or telephoto lens with a focal length of 400 millimeters or more: This helps to get detailed, close-up shots of the eclipse and will give you a reasonably large image of the sun's disk in the frame. A focal length between 500mm and 1000mm (35mm equivalent) will probably work best. Once you get up to around 1000mm you risk cutting off part of the Sun and Moon.
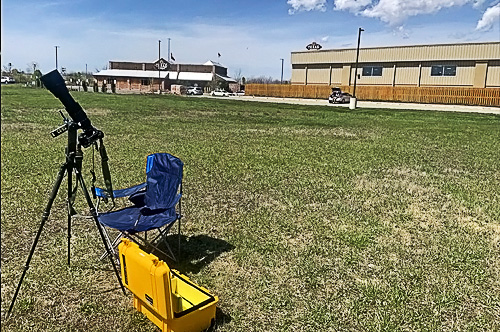
Use a sturdy tripod: When photographing the partial phases of an eclipse, the sun is very bright and your shutter speeds will be short, so you technically don't need a camera support to avoid camera shake. However, cameras and telephoto lenses can become rather heavy so having a tripod to support your camera is recommended. And during totality, when the sun is blocked out, you are going to be photographing in darkness and then you will need a tripod. Make things easy on yourself and just use a tripod for the entire event.
Find a location to set up your equipment that will have an unobstructed view of the full eclipse path, away from crowds and parking lot lights that may turn on during the eclipse.
Make sure your tripod and head are strong and stable enough to support your camera gear. Keep your setup as portable, light and easy to assemble as possible in case you need to relocate in a hurry to escape crowds. If possible, add weight to the bottom of the tripod to help stabilize it, with the weight touching the ground and hanging from the center column.
Because the Earth is rotating, the sun will move the distance of about one solar diameter through the sky every two minutes. Therefore you have to track the sun across the sky either manually by hand or on a tripod, or with an electronic tracking telescope mount. You might find that a Gimbal tripod head works better than a standard ball head if you are manually tracking the sun with a tripod.
If your lens offers Image Stabilization, I would recommend using that feature, particularly during the dark period of totality. Some camera engineers recommend switching IS off when you are mounted on a tripod, so use your own discretion since that depends on which lens model you are using. However, in my personal opinion, in any situation where you're not truly rock-steady, even if you are mounted on a tripod, using Image Stabilization normally makes sense.
Set your camera to its highest resolution: To record as much detail and color information as possible, use your camera's highest-quality (least-compressed) JPEG setting or "lossless" (uncompressed) image formats such as TIFF or RAW.
ADVERTISEMENT
Use a low ISO setting: You should set your camera to its lowest native ISO (the lowest un-boosted ISO setting) to reduce noise.
Switch to manual: Set your camera to "manual" (M) mode for both your camera and your lens so you'll be able to control its focus as well as exposure and white-balance settings. This is not the time to rely on your camera making exposure decisions.
Switch to manual focus mode and, after focusing, place gaffer's tape around your focus ring to lock down your focus.
Focus carefully: For a great image, make sure your image is properly focused. Focus carefully on the sun's edge (or on sunspots if some are visible) and make sure you are in manual focus and place a piece of adhesive or gaffers tape on your telephoto lens' focus ring to keep it from accidentally being moved during the eclipse (since the sun moves one width every two minutes, you will be frequently repositioning your camera to track the eclipse so you don't want to accidentally bump and knock your focus ring out of focus). Be sure to recheck your focus as the eclipse progresses and refine it if needed. If your camera offers focus peaking (where the camera places a colored outline around the edges of objects in the display that are in focus), this feature can give you constant visual confirmation that your image is still in focus.
Focus Peaking can place a colored outline like this blue line around objects that are in focus, providing constant visual confirmation that your eclipse is still in focus.
Regarding focusing, remember that the Sun is approximately 93 million miles away and the moon approximately 238,855 miles away. Neither the Moon nor the Sun are perfectly smooth spheres. When you photograph something outside of our atmosphere, there is approximately 300 miles of air between you and your subject. Once light travels through space and arrives in our atmosphere, all sharpness bets are off. Lunar craters and sunspots are not going to be tack-sharp, regardless of the quality of your filters or lenses. There is a reason they put telescopes on the tallest mountains or out in deep space. Don't expect critically sharp images, regardless of the quality of your lenses, but try your best to retain focus.
Minimize vibrations: There are a lot of things that can lead to camera vibrations which can cause your image to be unsharp. Mirrors in DSLR cameras snap open and closed, which can cause your camera to vibrate, so use the camera's mirror lock-up feature (if available) before each shot to keep vibrations to a minimum. You should also operate the shutter with an electronic cable release to eliminate camera shake caused by pressing the on-camera shutter button with your finger (and if you don't have one, use a short 2-second self-timer). If you can avoid it, don't extend your tripod's center post which causes the effective load on the tripod to be higher and more unstable. Choose an observing spot that is shielded from the wind and, if it isn't needed, remove your camera's lens hood so that it's less likely to catch the wind and vibrate your camera.
Bracket your exposures: It's a challenge to determine the correct exposure beforehand so shoot the eclipse at various shutter speeds to make sure you capture a properly exposed shot.
During the eclipse event, the light does not really change dramatically until the eclipse gets close to totality, so your camera settings can remain static for most of the eclipse event. However, as the eclipse approaches totality the light will be change quickly and you must be ready to react.
Once the sun is totally obscured you must remove your filtration and photograph totality without a filter, and this is the time to start bracketing your shots. A magnetic filter allows you to quickly remove and replace your filter with minimum disruptions. There is a 12-stop dynamic range from the corona at the sun’s surface to the outer edges of the corona, so during this rare event take a bunch of bracketed images over a 10-stop range instead of locking yourself into one exposure.
At the end of totality, replace your filters and return to your previous exposure setting while you continue to shoot as the Moon begins to move away from the sun and sunlight starts to reappear.
Don’t be afraid to underexpose by a stop or two, or more, to help avoid blown-out highlights (use the highlight “blinkies” if your camera has them). Occasionally glance at your histogram to verify exposure.
I shot the 2024 eclipse with my Nikon Z 9 with my Sigma 150-600mm ƒ/5-6.3 DG OS HSM lens and my Sigma TC-1401 Teleconverter, and I shot RAW files. To prepare auto-bracketing, in Setup I went to the Photo Shooting Menu, then went to Auto Bracketing, and set Auto Bracketing Set to AE. I set Number of Shots to 5F and Increment to 2.0. Once we started to enter totality and right before the Baily’s Beads appeared I quickly changed my exposure (I was using Manual Mode) to 1/30th of a second at f/8 (I was already at ISO 64). I then pressed my BKT button on the top of my camera and selected 2.0 and 5F, which turned Auto-bracketing on. I then turned on high continuous shutter mode and held my shutter down while the camera took five auto-bracketed shots (all at f/8 with the first shot at 1/30th of a second, the second at 1/500th of a second, the third at 1/125th of a second, the fourth at 1/8th of a second, and the fifth at ½ second). I then quickly pressed the shutter button down again and took another series of five shots, and I repeated this process for a short period until we entered totality when I removed my solar filter and shot the eclipse in totality with the same auto-bracketing settings, quickly checking my histogram to verify that I was capturing usable photographs and prepared to adjust my shutter speed if necessary. Once totality ended I replaced my solar filter on my camera, turned off auto-bracketing and high continuous shutter, and reverted back to the exposure settings I was using during the earlier partial portion of the eclipse.
Use a fresh battery: DSLRs can easily drain their batteries, especially if you use the LCD screen a lot to review your shots or Live View for the duration of the eclipse. Make sure you have a fully charged battery right before the eclipse begins and have a spare one handy next to you (and not stowed away in the car), just in case.
Test your equipment setup: Be sure to try out your actual equipment setup outdoors in a "trial-run" before the eclipse. This will reveal any potential problems with using your equipment, focusing and vibrations, internal reflections or vignetting in the optics, etc. Take some test shots of the sun to give you an idea of what exposure settings you will want to use with your camera and solar filter. Familiarize yourself with setting up and switching to bracketing mode, and switching to high continuous shutter mode, so that you can switch quickly once totality arrives (and you can switch out of it quickly once totality ends).
I printed notes to use as a check list showing what time I needed to start, change shutter speeds, turn on auto-bracketing and continuous shutter, remove my filter, and then replace my filter and revert back to my original exposure settings, which I kept in my pocket and frequently referred to just to make sure I had everything covered. And I practiced with my notes before the eclipse so that I was certain things would go smoothly.
Share: Don't forget to share your eclipse experience with friends and family afterwards. Tag @NASA to connect your photos on social media to those taken around the country and share them with the millions of others who follow NASA.
Have some fun: A solar eclipse is definitely a remarkable experience, and probably a once-in-a-lifetime one. Don't forget to have some fun, and Happy Shooting!
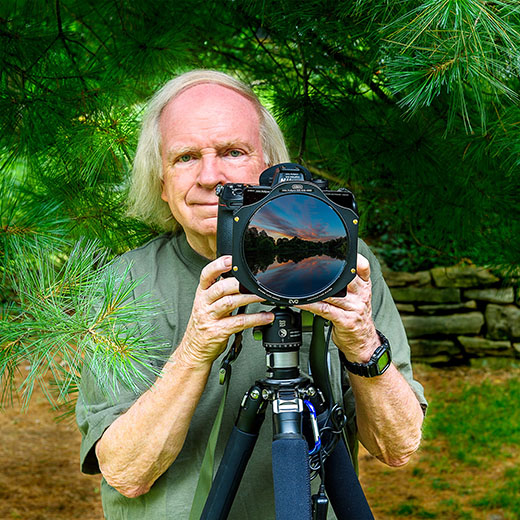
John Hultgren
I am a fine art and conservation photographer, author, educator and Team Kentucky Artist from Louisville, Kentucky, who uses photography to advocate for conservation outcomes, protect nature, and improve the natural environment. Conservation photography furthers environmental conservation, wildlife conservation, habitat conservation and cultural conservation by expanding public awareness of issues and stimulating remedial action. You can see more of my work at www.hultgren.org.


 ADVERTISEMENT