Digital camera settings can be very confusing, leading many users to rely on the camera's automatic modes so that they can concentrate fully on composing and capturing their photographs.
There is certainly nothing wrong with using your camera's automatic modes but you will find that you can do more with your photography when you know how to control some of these settings. Most of these confusing camera settings deal with exposure. Exposure is very important and by understanding just three exposure settings you will be able to use one of the semi-automatic or manual modes to take much better photographs.
Exposure simply refers to the amount of light that was recorded by the camera's digital sensor (or the amount of light that film was "exposed" to). Too little light and you end up with a dark photograph; too much light and your photograph is too bright. Both are a problem because you will end up with a murky photograph that lacks detail (and the photograph's story is in the details).
There are three ways that we can control light with our camera and all three of these methods work together to achieve proper exposure. You can set the proper exposure with different variations of each of these three methods (we are looking for the proper balance between the three methods and you can maintain this balance by increasing one of these methods while decreasing one of the other methods by an equal amount).
Balancing the camera's ISO, aperture, and shutter speed is the key to great photography exposure and with a little practice you will be able to master this juggling act and more consistently take great photographs.
Most every modern camera has an automatic exposure mode (along with some semi-automatic exposure modes). Many cameras have multiple automatic modes (such as landscape and sports modes which assign a priority to either the aperture or the shutter speed when calculating that exposure balance). Cameras can do a great job calculating exposure but they aren't perfect. Taking back full or partial control of the exposure is one of the ways photographers can use their own vision to create their photograph.
For example, consider a beautiful winter landscape covered in fresh, bright, snow. This scene will be a very challenging photograph for any photographer because light meters (such as the one built into your camera, or even a hand-held light meter or a light meter app on your cellular phone or personal device), which are used the measure the light, will "see" everything as a neutral gray (when, in this situation, it should be seeing the bright white snow). This will result in the snow looking gray instead of white in your photograph. This creates a situation where your camera or light meter just isn't up to the challenge (computers are great tools, but sometimes we just need to include a little human judgement).
Not all photographs are as challenging as snow, but many can still be challenging. Consider wedding photography, where the bride is usually wearing white and the groom is usually wearing black. When the bride and groom stand next to each other, this creates an extreme contrast range, and while the human eye does a great job seeing detail in extreme contrast ranges, digital sensors (or even film) do not. Taking a photograph of the bride and groom standing next to each other and capturing the detail in both the bride and groom's clothing (where the bride's dress isn't overexposed and too white without any detail, and the groom's tuxedo isn't underexposed or too black without any detail) is not easy.
While some minor errors in exposure can be fixed during post-production (especially if you are working with RAW files), not everyone wants to work with their photos afterwards. And it is always helpful to take your photograph with the correct exposure in the first place.
Many cameras will let you measure the light through your camera's viewfinder in different ways (from a wide measurement, measuring everything that is visible in the camera's viewfinder, to a narrow measurement of just a spot of what you see in the viewfinder). Because digital camera sensors and film do not have the same latitude between darks and lights that our eye has, you run the risk that some areas of your photograph will be overexposed (too bright) while others are underexposed (too dark). Even worse, some camera settings may result in a photograph that is properly exposed but with your subject left as an unrecognizable blur (because your shutter had to stay open too long to allow enough light to enter the camera).
Having a basic understanding of exposure will really help you capture the scene the same way that you are envisioning the final photograph prior to pressing the shutter release button.
What is exposure? You set your camera's ISO, aperture, and shutter speed to control how much light is allowed into your photograph. A photograph's exposure determines how light or dark an image will appear after it has been captured by your camera. The more light you let into your camera, the brighter your photograph will be. There is no "one perfect exposure" because every scene that you may wish to photograph will be bathed in a different amount of light, and sometimes that amount of light changes minute-by-minute. Perfect exposure is also subjective — one photographer may prefer a part of a scene to be darker while another photographer may prefer that part to be lighter. (Both are correct and the result depends on the photographer's vision, but it should be the photographer's decision and not the camera computer's decision.)
Light is controlled inside your camera by: 1) the sensitivity of the digital sensor (ISO or film speed if you are using film); 2) the lens aperture (the size of the opening behind the lens that allows light to pass through the lens to the sensor or film); and 3) the shutter speed (how long the shutter remains open to allow light to hit the digital sensor or film). Changes in any of these three light controls (ISO, aperture, and shutter speed) will affect your final photograph in different ways and it is important to know how each of these controls will affect your photograph so that you can make informed decisions as you set the camera's exposure controls.
The easiest place to start is by using one of the camera's automatic modes to see what results the camera's computer gives you (many professional photographers don't solely rely on full manual control; you purchased all of these tools so it makes sense to use them in varying degrees). Once your camera gives you a proper exposure, then you can go back and tweak the three controls (ISO, aperture, and shutter speed) to achieve a better photograph.
There are two concepts that you need to first understand:
The Exposure Triangle: The Exposure Triangle is simply a common way of associating the three variables (ISO, aperture, and shutter speed) that set exposure. You can't adjust the exposure triangle and it doesn't provide you with any camera settings: the exposure triangle is simply a way of visualizing that there are three equal components to exposure. A photographer has to balance all three of these components to achieve a desired result, and an adjustment to one requires an opposite adjustment to at least one of the other two.
For example, let's assume you are using your camera's automatic mode to take a photograph of your daughter playing in a fast-moving soccer game one evening. You review the image on your camera's display and it is properly exposed, but it is a little blurry because of the fast action. You look at the camera settings and notice that the shutter speed used for this photograph was 1 / 60 of a second. Professional sports photographers use a shutter speed of around 1 / 1000 of a second to stop motion, so increasing your shutter speed will probably take care of the blurriness. Increasing your shutter speed (meaning that the shutter will open and then close faster) will let less light into your camera, affecting your exposure. Because the exposure triangle tells us that exposure is a balance between ISO, aperture, and shutter speed, then decreasing the amount of light by increasing the shutter speed means that we need to increase either the sensor's sensitivity (by increasing the ISO) or increase the amount of light that is allowed to pass through the camera's lens (by making the lens' aperture larger). We can increase either the ISO or the aperture (or both by a smaller amount) to achieve this balance.
Keep in mind that these three adjustments do not only affect exposure; they are also the largest determiners of the global appearance of the resulting photograph and are crucial for both technique and composition. We will discuss how these three adjustments will affect how your photograph will look later in this article.
In our example we discussed that we need to increase our shutter speed to freeze the action, so we will increase our shutter speed from 1 / 60 of a second to 1 / 1000 of a second. Since we now have to let more light into the camera, we make the decision to open up our aperture more. But how much do we open it? The shutter speed dial on your camera has settings like 1 / 125, 1 / 250, and 1 / 500, but the aperture has settings like f / 2.8, f / 4, and f / 5.6. How do they relate?
The thing that equalizes ISO, shutter speed, and aperture is called "stops," and if we increase one of the variables by one stop then we need to decrease one or both of the other variables by a total of one stop to balance the exposure.
Stops: You won't find a "Stops" dial on your camera (although you probably have a stops setting in your camera's configuration menu). But stops are actually a very simple concept: A stop is a doubling or halving of the exposure (the amount of light captured when taking a photograph).
As I mentioned earlier, exposure depends on your ISO, shutter speed, and lens aperture which all work together and must be balanced for proper exposure. While ISO, shutter speed, and aperture all have numbers that you can set, these numbers don't obviously relate to each other and thus it is hard to compare ISO, shutter speed, and aperture to each other. By introducing the concept of stops, we can easily make comparisons.
ISO refers to the sensitivity to light of the camera's digital sensor and is measured using values that correspond to the ASA scale for film, with a higher ISO number relating to a more sensitive sensor. Doubling the ISO number increases the sensor's sensitivity by 1 stop, while halving it decreases the sensitivity of 1 stop. For example, switching from ISO 100 to ISO 200 doubles the sensor's sensitivity, producing a 1 stop increase. Switching from ISO 100 to ISO 50 is a 1 stop decrease, making the sensor half as sensitive to light. Most cameras let you change ISO speed in increments of 1 stop, so rotating your ISO dial one click in one direction will increase your ISO one stop, and rotating the dial one click in the opposite direction will decrease your ISO one stop. Some cameras allow a configuration in 1/3- or 1/2-stop increments in the camera settings.
Shutter speed measures how long your shutter is left open to expose the camera's digital sensor to light. Doubling or halving your shutter speed produces an increase or decrease of 1 stop of exposure. For example, changing from 1 / 60 of a second to 1 / 120 of a second lets in half as much light (because the shutter closes faster), so we can say we've decreased the exposure by 1 stop. Similarly, going from 1 / 60 to 1 / 30 lets in twice as much light because the shutter is open twice as long, giving a 1 stop increase in exposure. Most cameras allow you to adjust shutter speeds in increments of 1/3 of a stop, so 3 clicks of the shutter speed control dial either way will adjust your exposure by 1 stop.
Aperture is measured using the "f-number", sometimes called the "f-stop", which describes the diameter of the lens aperture. A lower f-number relates to a wider aperture that lets in more light while a higher f-number means a narrower aperture that lets in less light. The numbers themselves may seem confusing to many photographers but the numbers are simply a ratio between the diameter of the aperture and the focal length of the lens. What is probably more useful to you is knowing whether the clicks of the aperture ring on your lens (or the aperture control dial on your camera) are in 1-stop, 1/2-stop, or 1/3-stop increments. Many of today's lenses can communicate with the camera and the camera controls what f-stop values can be selected on the camera (and these can be configured in your camera settings).
Why stops are an important concept for photographers to understand is because stops are the easiest way for a photographer to relate ISO, shutter speed, and aperture to each other. If you have set up a properly exposed photograph and want to change the shutter speed (and while watching the shutter speed setting in your camera's display you select a shutter speed that is three clicks clockwise on your control dial), then to maintain exposure you are going to have to change ISO or aperture three clicks on their control dial in the opposite counter-clockwise direction (or, change one of them two clicks and the other one click).
Measuring and Setting Exposure:
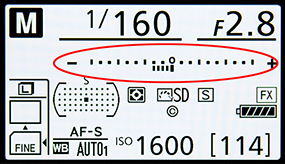
Most cameras have a built-in light meter that you can view through your viewfinder. Many also have a display that can be viewed on the camera body (such as the illustration to the left of the Nikon D810 Control Panel that is on the top of the camera body). Other camera makes and models have similar light meter displays. Because this camera has been configured to use 1/3-stops, each marking to the left of the center zero indicates that the meter is reading a value that is one-third of a stop underexposed (and each marking to the right of the zero indicates a value that is one-third of a stop overexposed).
In this Nikon light meter example, the light meter is activated when the shutter release button is depressed halfway. Proper exposure is indicated when the arrow in this illustration's red circle is lined up with the zero mark in the middle. The arrow can be moved to the left or right by changing the aperture, shutter speed, and/or ISO. Moving the indicator to the left will make the photo darker, and moving the indicator to the right will make the photo lighter.
The light that you are measuring is not always that obvious so you need to know what metering methods are available with your camera, and then which one of those methods you have selected so that you are certain you are measuring the part of your photo that is most important. Some common metering methods available include:

At this point, you should be able to compose your photograph in the viewfinder, activate your camera's light meter, and measure and adjust the exposure. But which of the three light controls (ISO, aperture, and shutter speed) should we adjust to get the proper exposure? This isn't always an easy choice, particularly for new photographers, because each of these light controls will affect your photograph in different ways. However, knowing how each of these light controls will affect your photograph is very important in the creative process. Two photographers taking a photograph of the same subject, side-by-side at the same time, will probably end up with two different photographs, and some people will find one photograph to be better than the other. This is where the creative process comes into play. Composition (how each photographer framed their photograph) is certainly important, but so are the exposure settings.
ISO: ISO (which is also called ASA) stands for the International Organization of Standardization, which is the main governing body that standardizes sensitivity ratings for camera sensors (among many other things). We use the same term (and standards) for film. When you change the ISO setting on your camera, you are changing your camera's digital sensor's sensitivity to light.
This is a great convenience. With film cameras we couldn't change the ISO unless we put in a roll of film that was manufactured with a higher ISO. Now we can change the ISO on the fly, varying the ISO from picture to picture.
When you change the sensor's sensitivity to light, you also change the digital sensor's susceptibility to electrical interference, so changing the ISO also affects image quality. A higher ISO typically translates to a noisy or “grainy” image, just as a higher ISO film has more grain than one with a lower ISO.
I typically try to use the lowest ISO that my camera offers because this creates a photograph that has less artifact, or noise. This is important to me because many of my photographs are printed in a very large print size and I don't want these artifacts to be noticeable. If I can't capture my photograph at my preferred ISO, then I consider adding supplemental lighting or shooting at a different time of day. That being said, there are some photographs where I prefer to use noise as part of the creative process (such as when I am trying to capture the illusion of old newspaper photographs taken in low-light situations that were noticeably grainy, which can add a certain mood to my photograph).
Shutter Speed: Your camera's shutter speed (or exposure time) is the length of time that your camera's shutter is open when taking a photograph, so it is the length of time that the camera's digital sensor or film is exposed to light. The amount of light that reaches the film or sensor is proportional to the exposure time.
Shutter speed is responsible for primarily two things: 1) changing the brightness of your photograph, and 2) creating dramatic effects by either freezing action or creating creative blurs or motion.
If your shutter speed is long, any moving subjects in your photograph will appear blurred. This can be used to create the sense of motion, which is also a part of the photographic creative process. It's up to the photographer to decide where the blur will occur either by letting the background stay sharp while the subject moves, or to pan with the subject while the background blurs. Both create the sense of motion.
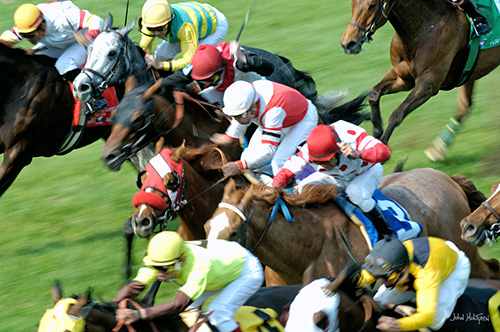
For example, consider that you are taking a photo of a bicycle race. A sports photographer would try to use a shutter speed of 1/1000 seconds to freeze a passing racer. However, a creative option would be to use a slower shutter speed (perhaps 1/100 seconds) while trying to pan the camera, following the racer with the camera. This would hopefully (if you are lucky) result in a photograph where the racer is reasonably sharp but the background and perhaps the racer's feet and wheel spokes are slightly blurred, drawing the viewer's immediate attention to the racer and creating a sense of motion.
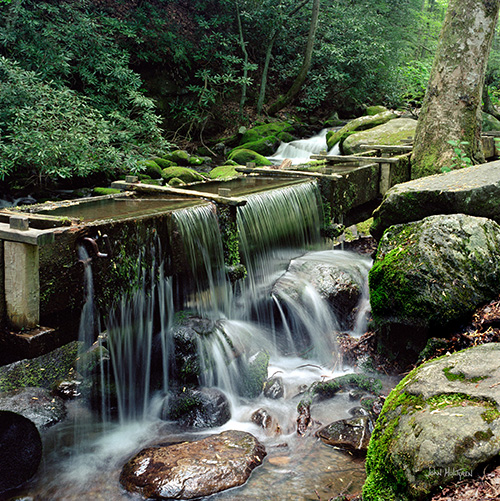
For a different example, consider a waterfall. By using a shutter speed of 1 second you could keep your camera steady on a tripod, capturing the sharpness of the rocks while the water flow blurred, along with a higher aperture for better depth-of-field.
Both are interesting ways to create motion in a photograph and it is techniques like these that set one photographer apart from another.
Aperture: Your lens' aperture controls the amount of light that passes through the lens to your camera's digital sensor. The aperture can be made larger (letting in more light) or smaller (letting in less light).
But the aperture also affects "depth of field." Depth of field (DOF), also called focus range or effective focus range, is the distance between the nearest and farthest objects in a scene that appear acceptably sharp in an image. Because a lens can precisely focus at only one distance at a time and because the decrease in sharpness is gradual on each side of the focused distance, the area where unsharpness is imperceptible under normal viewing conditions is called the "depth of field."
There are times when a photographer may find it desirable to have the entire image sharp, so a large DOF is appropriate. But there are also times when a small DOF may be more effective, emphasizing the subject while de-emphasizing the foreground and background. This is part of the photographer's creative process.
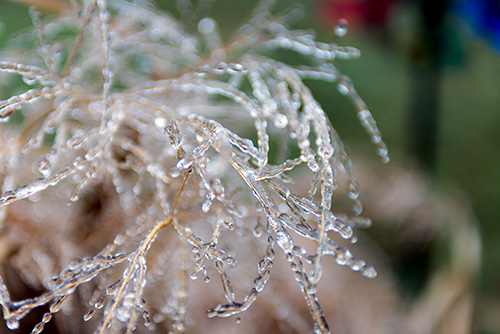
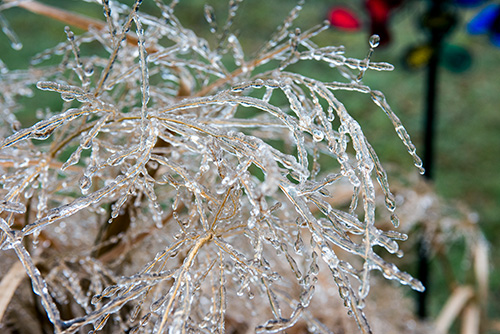
In the example above, I increased my DOF by decreasing my aperture. I was able to maintain exposure by increasing my ISO. I could have also decreased my shutter speed, but I would not be able to hold the camera stable enough and did not have my tripod handy, so increasing ISO was my only option.
So where do I start?: Deciding where to start setting your exposure setting may seem difficult at first, but if you really can't decide where to start, then start with full automatic mode and let the camera's computer make the decisions. Once you get a properly exposed image, look at the settings that the camera selected and then think about how the three setting might affect your photograph and start making changes from there.
Do you think you might want some large prints where you don't want any noise or artifact visible? Then see if using the lowest ISO your camera offers will allow you to still shoot a properly exposed photograph.
Next, think about how the depth-of-field will affect your photograph. If you are shooting a landscape, you generally want everything in focus so a smaller aperture will give you a greater depth-of-field. However, lenses begin to suffer from diffraction if you use the smallest apertures. Diffraction is a loss of sharpness or resolution caused by photographing with small f/stops. While the "sweet spot" where you will find the aperture that provides the highest quality varies by lens, the sweet spot is usually f/8. I try to shoot my photographs that I hope to eventually sell at f/8 and then adjust if I have to. I may adjust because I just can't achieve the depth-of-field that I am looking for, but I start with trying to make the photograph work at f/8 and then adjust as necessary.
Finally, think about shutter speed. Shots with action typically require a higher shutter speed so that you can freeze that action, but sometimes I want to get creative. For a scenic photo there usually isn't any action so the shutter speed isn't important (unless there is wind blowing the tall grass).
I have done a lot of helicopter photography, and for those shots I have placed my camera in shutter-priority mode. When I see some helicopter photographs, sometimes the photographer has used a fast shutter speed and they have frozen the rotor blades so that they are sharp (which to me makes the helicopter look like its rotor blades are not moving and the helicopter is falling out of the sky; others used a slow shutter speeds and the rotor blades are so blurred that you cannot see them, again making the helicopter look like it is falling out of the sky.) So for helicopter photographs I feel that the shutter speed takes priority. From experience I have learned what shutter speed to shoot at based on the make of the helicopter and the sound of the rotor blades, so I'll set my camera on shutter-priority mode, set the shutter speed, and let the camera adjust the f/stop as I turn and lighting conditions change.
For scenic shots, I usually set my camera on aperture-priority mode or manual mode, and I try to take my shots at f/8 because that is probably the aperture that will produce the highest quality photograph with my lenses. As lighting conditions change, aperture-priority mode will keep my aperture at f/8 and adjust my shutter speed to maintain exposure.
Selecting the proper aperture to achieve the depth-of-field you desire is important, but so is selecting the proper focus point. When focusing for a nice scenic mountain shot, you don't necessarily want to focus on the distant mountains. For these photographs, your camera will probably automatically focus on the distant mountains at infinity. But there is an area before and after your focal distance that will appear sharp (depending on your aperture and depth-of-field), so why not focus on something closer than the distant mountains that still includes your distant mountains in your depth-of-field? This way, you can include more of what lies between you and the distant mountains in your depth-of-field.
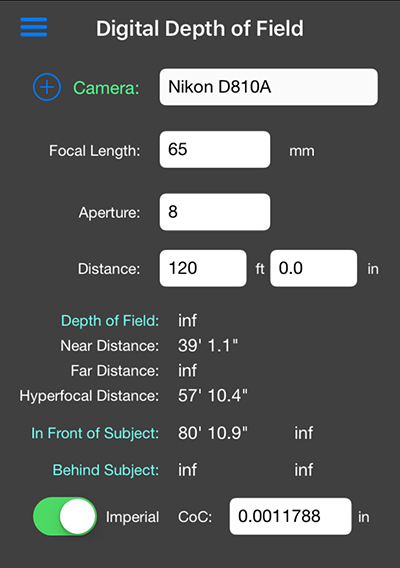
Hyperfocal distance is a distance beyond which all objects can be brought into acceptable focus and this is the focus distance that provides the maximum depth-of-field. Some lenses have focusing scales visible on the lens' body, but most do not. A focusing scale allows you to see what area will be in focus given a specific f/stop. For those without focusing scales, thanks to smart phones and tablets, there are now free apps available that allow you to quickly calculate the depth-of-field and hyperfocal distance. By using one of these resources, you can quickly determine where to focus your lens and still achieve your maximum depth-of-field.
Keep in mind that your camera's exposure meter is not necessarily measuring everything perfectly. As I explained earlier, your light meter is assuming that bright fluffy snow is actually gray, and you will end up with gray snow. When shooting snow a photographer typically has to increase their exposure +2/3 to +1-2/3 stops. (This is something that your camera cannot tell you — you just have to know.) And scenes with a lot of contrast may be too difficult for your meter to accurately measure. The best way to assess proper exposure is through the photograph's histogram (please see Understanding Histograms).
Taking technically correct photographs requires some knowledge and skill, and proper exposure is certainly a vital component of a techically correct photograph. The best way to master exposure is to take your camera out and play with the exposure settings, learning how each setting affects the final result. Go out and have some fun!
 ADVERTISEMENT